Introduction
Learn how Papys is structured and how it works.
Syntax & Components
The syntax is very simple. There are two main components, routes and actions. Routes are connected with the or operator. Actions are connected with the right-shift operator (>>). Schematically: Route1 | Route2 >> Action1 >> Action2. This is already the basic structure.
Route
The PRoute class takes the path as an argument and optionally a hook (more on hooks later). The path can be a complete path or a partial path. You can use regular expressions (regex) and placeholders (variables) in the form {name} in the path.
Action
The PAction class optionally accepts a string. This is only for the readability of your code. You can give the action a descriptive name. PAction also takes a function as an argument. This is executed in the step and has the following signature: Arguments: Request, Response. Return value: Tuple with status code (number), request, response. You have two options for implementing actions: 1) You implement the logic in a function, use PAction directly and pass the function. 2) You derive from the PAction class and implement your own class. You only need to overwrite the “process” method.
Deciding which node
The schematic representation Action >> Action is simplified. The flow of a request is not always serial. There are alternative paths, e.g. in the event of an error, but not only. In Papys, the decision as to which path to use is based on the status code. As you remember, the function has the return value signature: Tuple with StatusCode, Request, Response. The actions are therefore linked as a tuple or as a list of tuples with actions. The connection can therefore look like this: Action1 >> (500, Action2) or Action1 >> [(200, Action2),(500, Action3)]. First case: Action1 is executed. If the return value is 500, Action2 is executed. Otherwise it is finished. Second case: Action1 is executed, if the return value is 200, Action2 is executed, if the return value is 500, Action3 is executed. It is recommended that you use valid Http-status for the statuses. After all, it is a Rest API and this increases the readability of the code. However, you can use any integer number. In the standard actions, you can configure which codes should be returned for “success” and “error”. As a rule, the default is 200 for success and 500 for an error. Just make sure that the last action in the graph returns a valid Http status code, otherwise the desired code will hardly be sent to the client.
Example
We are ready for the first examples. The familiar "Hello world" application could look like this:

That's it! Don't worry about how to execute a Papys application now. We will cover this later.
Let's see an a bit more complex application. We handle a first error an check if the response match against a JSON schema. It looks like this:
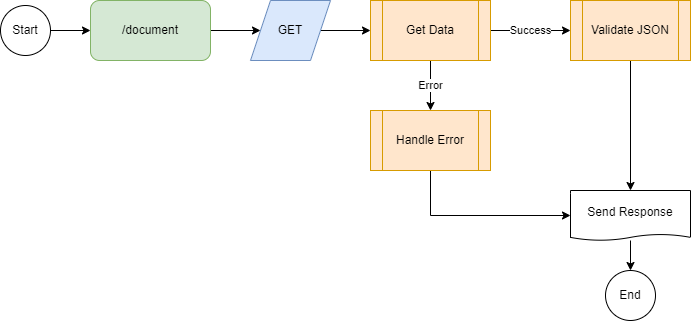
Now, this graph can be implemented as follows:
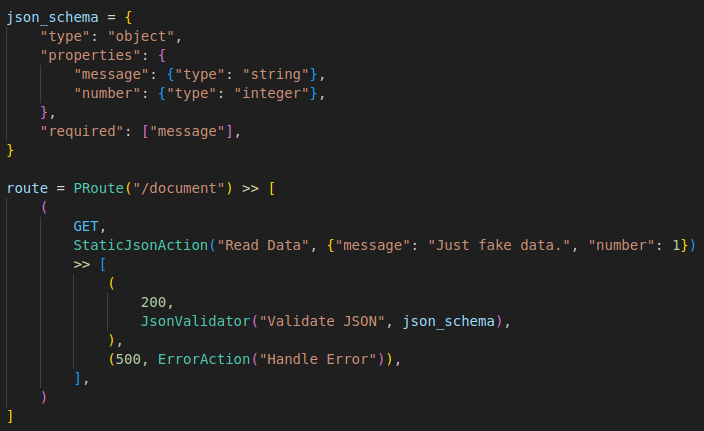
As you see there are already different PAction implementations of common tasks in place. Of course you can implement your own action class or functions for this - feel free.
The problem with our graph is that if the schema validation fails, the client gets an Http status 500, but still gets the string of the invalid JSON. And we have no idea what is wrong. Because the standard JSON validator does not change the response. This can be easily corrected by adding an error handler after the JSON validator:
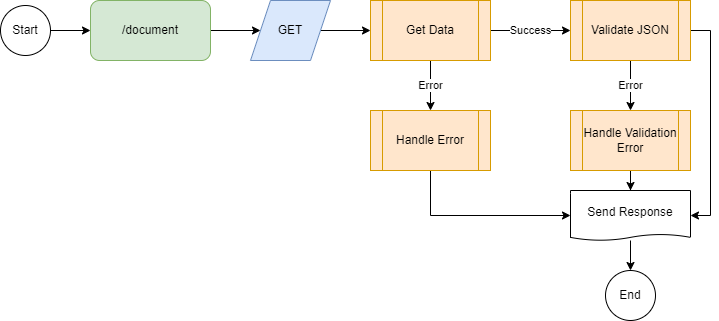
And our code looks now like this:
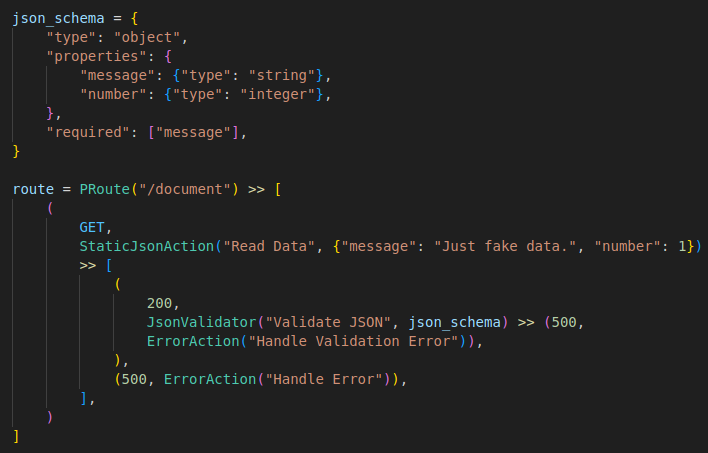
With this small extension, a clean message is now also returned in the event of a failed validation.
Reusability
Reusability is an important component of Papys. Not all API frameworks offer the option of reusing sub-routes. Imagine the following scenario: You have customers, suppliers and products. All have their endpoints and all offer the ability to store and retrieve documents:
/api/customer/{customer_id}/document/{id}
/api/supplier/{supplier_id}/document/{id}
/api/product/{product_id}/document/{id}
In your internal functions, you will implement the logic for saving and retrieving documents generically and therefore only once. Something like: save_document(owner_type, owner_id, document). It makes no sense to create 3 different tables for documents in a database and in a NoSQL database it also makes little sense to create 3 different sub-schemas for documents. Right? And it is just as unnecessary to implement the function 3 times in an API. Even if 95% of it is just copy&pase boilerplate code. The following example shows how you can define the sub-route for “Documents” once and then reuse it several times. We implement the following 9 endpoints:
GET /api/customer/{customer_id}/document
POST /api/customer/{customer_id}/document
GET /api/customer/{customer_id}/document/{id}
GET /api/supplier/{customer_id}/document
POST /api/supplier/{customer_id}/document
GET /api/supplier/{customer_id}/document/{id}
GET /api/product/{customer_id}/document
POST /api/product/{customer_id}/document
GET /api/product/{customer_id}/document/{id}
Of course, it would probably still need PUT and DELETE, so I'll take the liberty of leaving them out here. That's our code for this 9 endpoints:
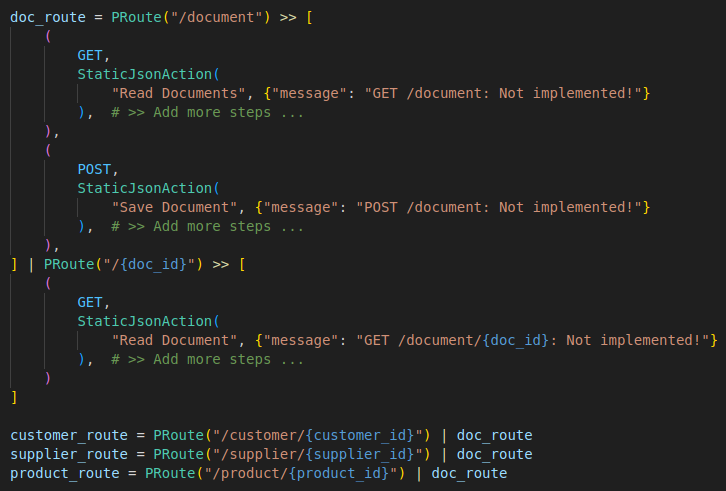
As you can see, the “document” block is defined once and then reused 3 times.
Let's get back to the generic implementation of “document”. You remember: save_document(owner_type, owner_id, document). How does the POST action know what the owner_type and owner_id are? This is different in the path. In the case of GET /api/customer/{customer_id}/document/{doc_id}, the owner_type is = “customer” and the “owner_id” = {customer_id}. In the other examples, as already mentioned, it is different. This is where the hooks come into play.
Hooks
Hooks refer to a route and apply accordingly to all actions of this route. Important: Hooks also apply to all sub-routes. Hooks are always executed before the action. The signature is almost identical to an action. They receive the request and response as parameters and return the true/false, status and request and response as a tuple. True means that the action process continues as normal. If False, the process is aborted and the response is sent to the client. Hooks can therefore be used to easily solve tasks centrally. Let's take a look at our example with the document path. We need a function that performs a mapping. There is a standard hook for this, ParaMapHook. You can pass a mapping of the path variables to this hook. You can overwrite values of path variables, assign existing values to new variable names or assign new values to a variable as a string. We need an ID and a type for our document path. The following code example shows how easy it is to implement such a mapping with a hook:
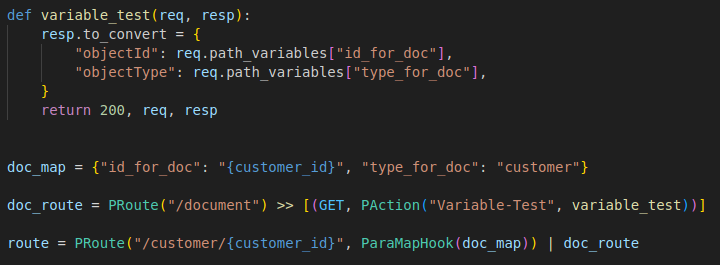
You need more than one hook for a path? Now worry you can chain them: Hook1 >> Hook2
Request- and Response-Object
The Request and Response classes are existentially important. The process methods are called up with the current objects of these classes and expect them back. They receive all the necessary methods and can store the return value and header information etc. in them. The Python documentation provides you with information on all available attributes.
Even more control with initialize- and finalize Hooks
With set_initalize_hook you can define a hook that is executed at the very beginning, before the graphs start their journey. This gives you the option of firstly changing the path. You can only do this with such a hook. Subsequent changes to the Request.path attribute do not have the desired effect. Secondly, you can cancel the call. If you return “False”, the graph will not be executed at all. Or thirdly, you can of course start the graph with or without previous changes, e.g. to the path variables. With set_finalize_hook you have the option of performing a final check after the graph is finished before the result is definitely sent to the client. These are normal hooks, so you can also chain them if required: Hook1 >> Hook2.
Path Cache
The resolution of the path to the correct graph is stored in an internal cache. This means that this calculation does not have to be repeated every time an identical path is called up. It is important to understand that only the graph itself is cached. The result itself is not saved and must be recalculated each time. It is therefore really only a matter of speeding up the evaluation of the path with its variables. You have the option of configuring how many paths are to be saved. The default is 100,000, but you can also implement and use a completely separate cache if you have a better mechanism. Use set_path_cache to set an own implementation or to use de default one with an other number of max path to store: set_path_cache(PathCache(100)).
Logger
There is an integrated logger. This is included with every request as a reference. Request.logger. This logger logs structured in JSON format on the console. This means that the logs in the Google Cloud (GCP) can simply be used directly in Cloud Logging as an example. You have the option of implementing your own logger. You can assign this as follows: set_logger. This is then also always made available in the request.
Predefined Actions
There are various implementations for frequently used actions. The current ones are JsonStaticAction, JsonRequestValidatorAction, JsonRespValidatorAction, ErrorAction, RedirectAction and PostBounceAction. Hopefully more will be added over time and you are free to implement your own.
Configuration
You can make various configurations with set_config. One interesting configuration is: post_convert_201: By default, the http status code 200 is automatically changed to 201 if it is a POST request. This means you can use the same action for GET, PUT and POST and do not have to worry about the return value being 201 in the case of POST and having to make the graph even more complicated. Always use 200 for “OK” and in the case of POST it automatically becomes 201 at the end. You don't want that? No problem. That's what this setting is for. Or the setting: return_error500_body: This defines whether, in the event of an error (status code 500), the defined body should be returned at the end, or a separate body constructed from the error attribute of Response.
WSGI compatible, without dependencies
Papys is WSGI Standard compatible. This means that you can run the application with any Python WSGI compatible web server. Specifically, it implements the PEP standard 333. Known such web servers are Gunicorn or uWSGI. Papys (so far) does not require any third-party libraries and is extremely lean.
Installation & run
Install Papys with pip:
pip install papys
You find the Git repo here: GitHub
For production use a production ready WSGI server like Gunicorn:
pip install gunicorn
gunicorn -w 4 -b 127.0.0.1:8000 app:application
-w is number of workers. -b is binding host and port. app is the Python file name and application is the function name. See https://gunicorn.org/ for moore options.
You have to implement the "application" function. But this is a simple wrapper of the app function provided by Papys:

Project status
The first version 0.1 of the project is ready for public testing. Feedback is welcome and the project plan envisages that the stable version 1.0 will be available by the end of 2024.
Next steps
Now you are ready for a more or less complete example of Papys functionalities. Go her for the full example.